Rowing. It’s tough. It’s cool. It’s low-impact. And it burns a bucket-load of calories. So far, so spinning class. But unlike that other cardio superstar, rowing is a full body workout, targeting just about every muscle in your body.
The rowing machine is also versatile. Exercise alone or sign up for a high-energy, music-thumping rowing class. Do low-key endurance workouts or intense HIIT sessions. And no matter which way you like your rowing workout, each rowing stroke is essentially a blend of cardio and strength training. It’s why even the astronauts are doing it. In space.
Rowing Benefits
- Targets 86% of the body’s muscles, including muscles of the upper body, core, and lower body.1
- Builds muscular strength, power, and cardiovascular fitness.2
- Low impact, reducing stress and strain on the body
- Meditiative. The flowing movement of the rowing stroke can induce a zen-like state, increasing a calm and focus.
- Good for cross-training, especially for runners. Rowing works many of the muscles that tend to be weak in runners.
The rowing machine is sometimes called an indoor rower or ergometer (also “ergo”). It was originally invented to teach beginner rowers correct rowing technique before venturing onto the water. By an Athenian general, in 400 BC.3
Because when it comes to rowing, form is key. While rowing isn’t complicated, you still need to give yourself a little time to master the correct technique, and for the movement to feel natural and intuitive. Rowing with proper form will reduce the risk of injury, and ensure your workouts are as effective and comfortable as possible.
The Rowing Stroke
How to Row
The rowing stroke is broken down into four parts:
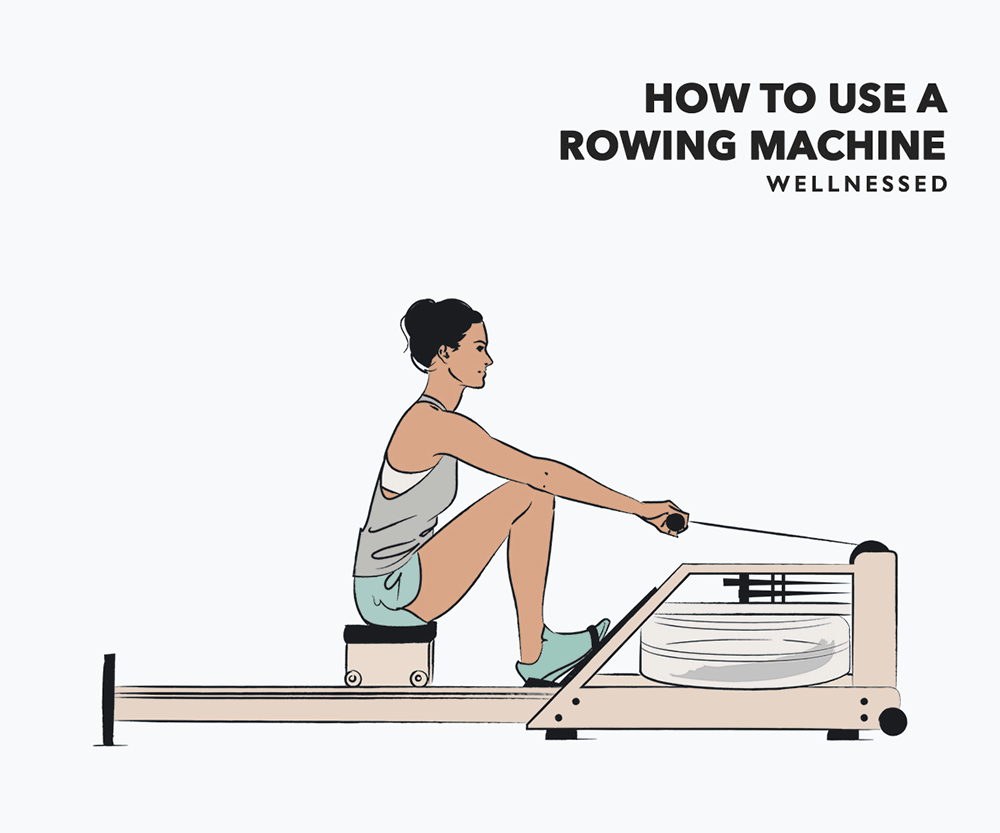
Sit on the rower and place your feet on the footplates. Adjust the foot straps so they are across over the ball of your foot.
Slide forward on the seat and grasp the handles with an overhand grip. Place your thumbs on top of the handle or wrap them around the handle as you prefer.
Swipe image to see more detail.
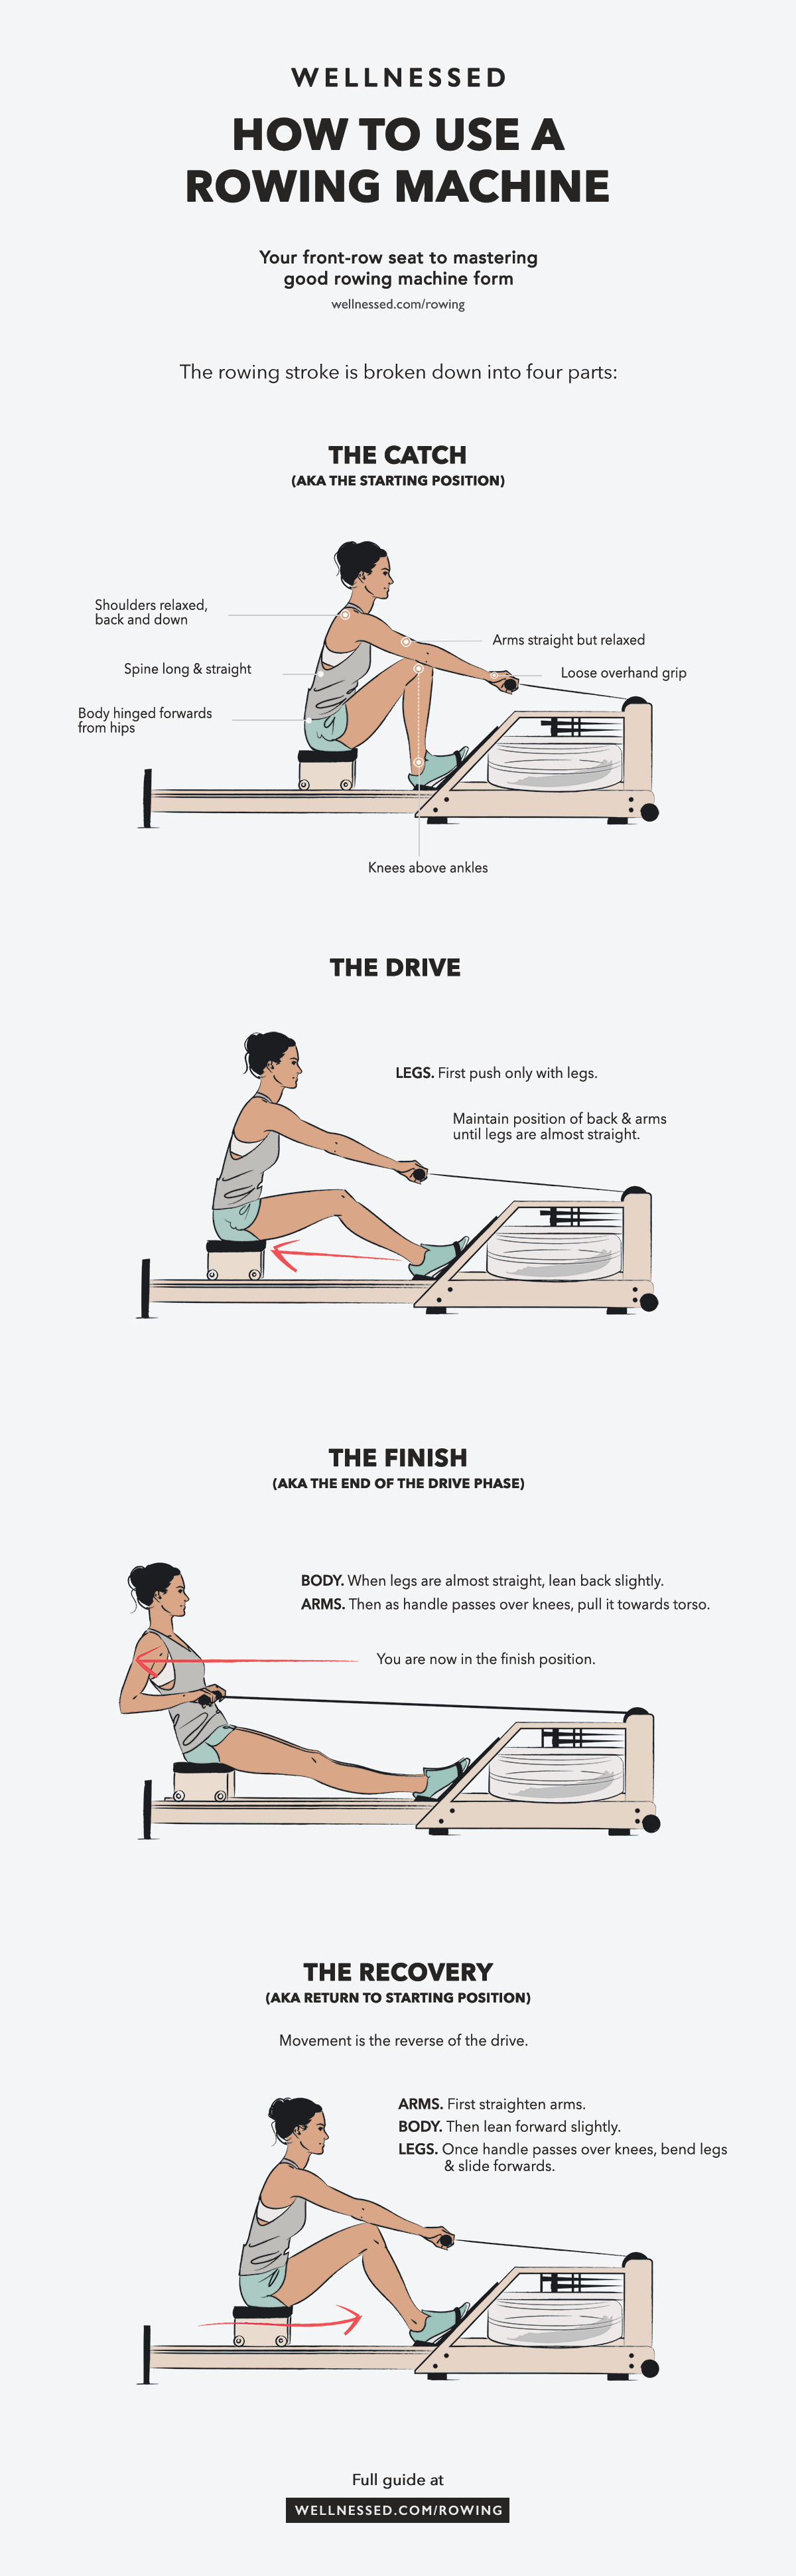
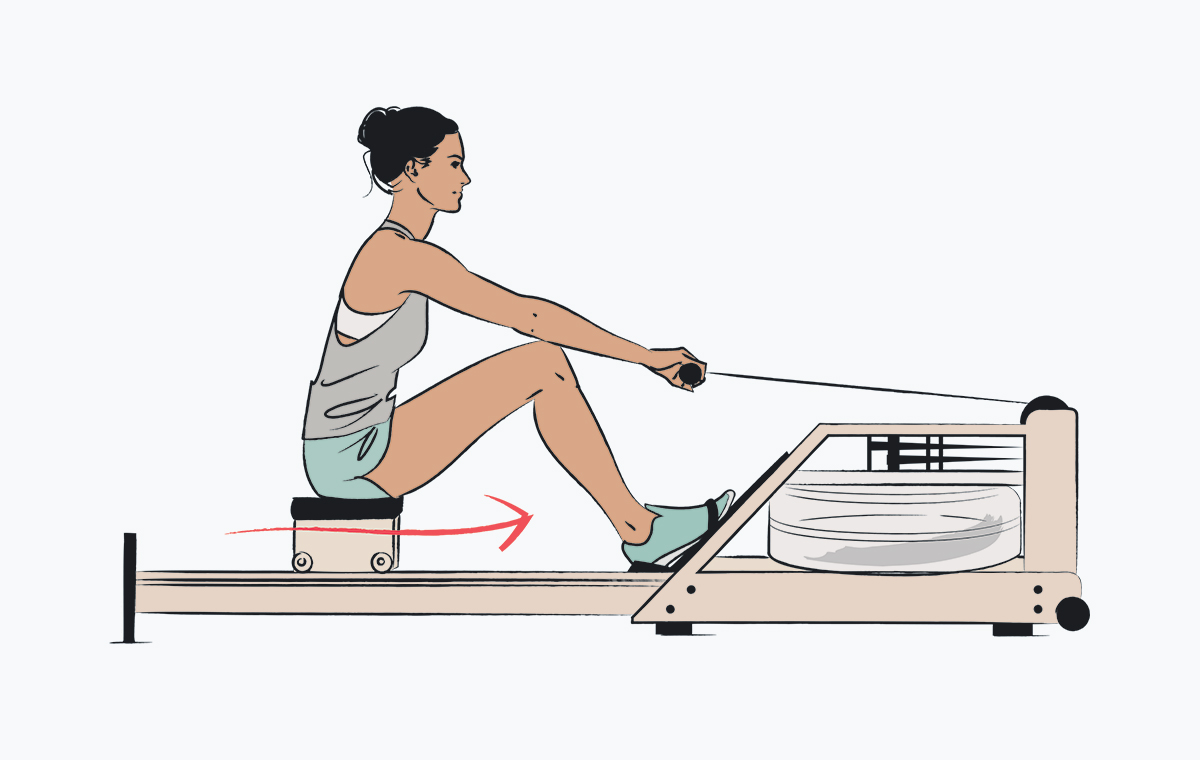
1 The Catch
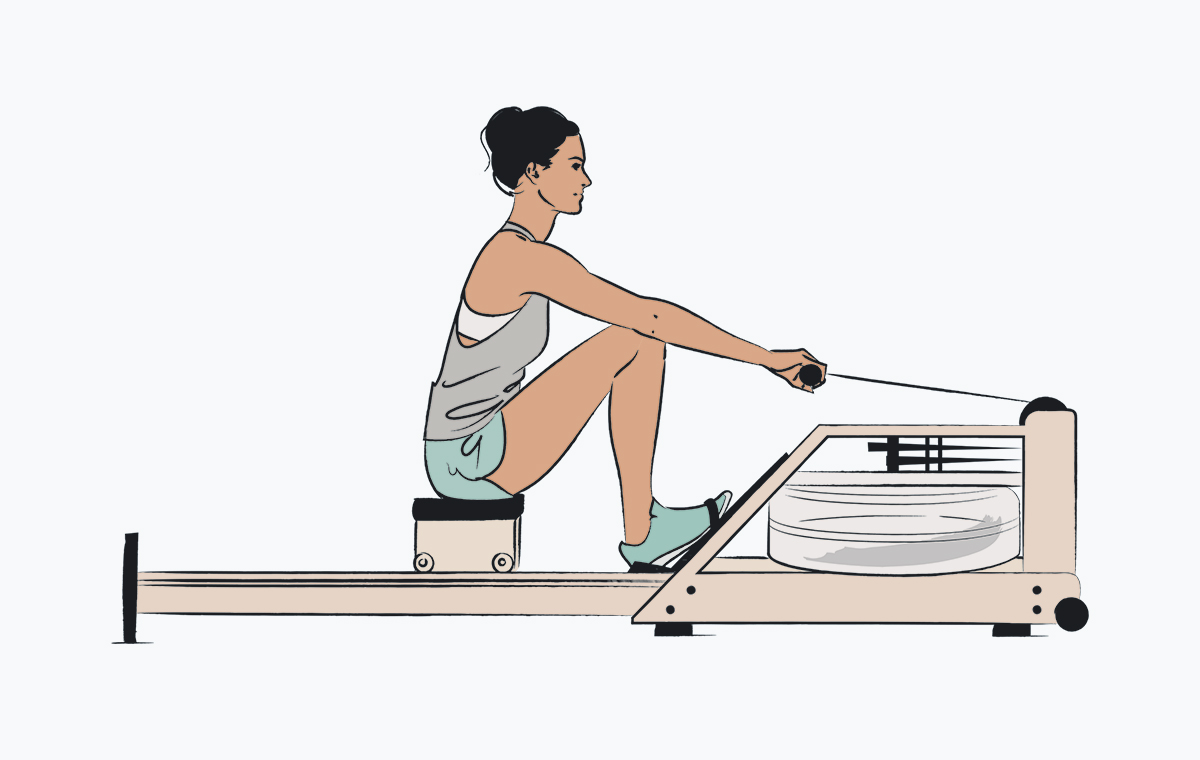
This is the start of the stroke.
- Grasp the handles with your arms straight.
- Sit up tall on your sitting bones (the bottom of your pelvis), with your back upright, knees bent and shins roughly vertical.
- Your body will lean forward slightly, but try to keep this to a minimum. Your upper body should be in about a 1 o’clock position.
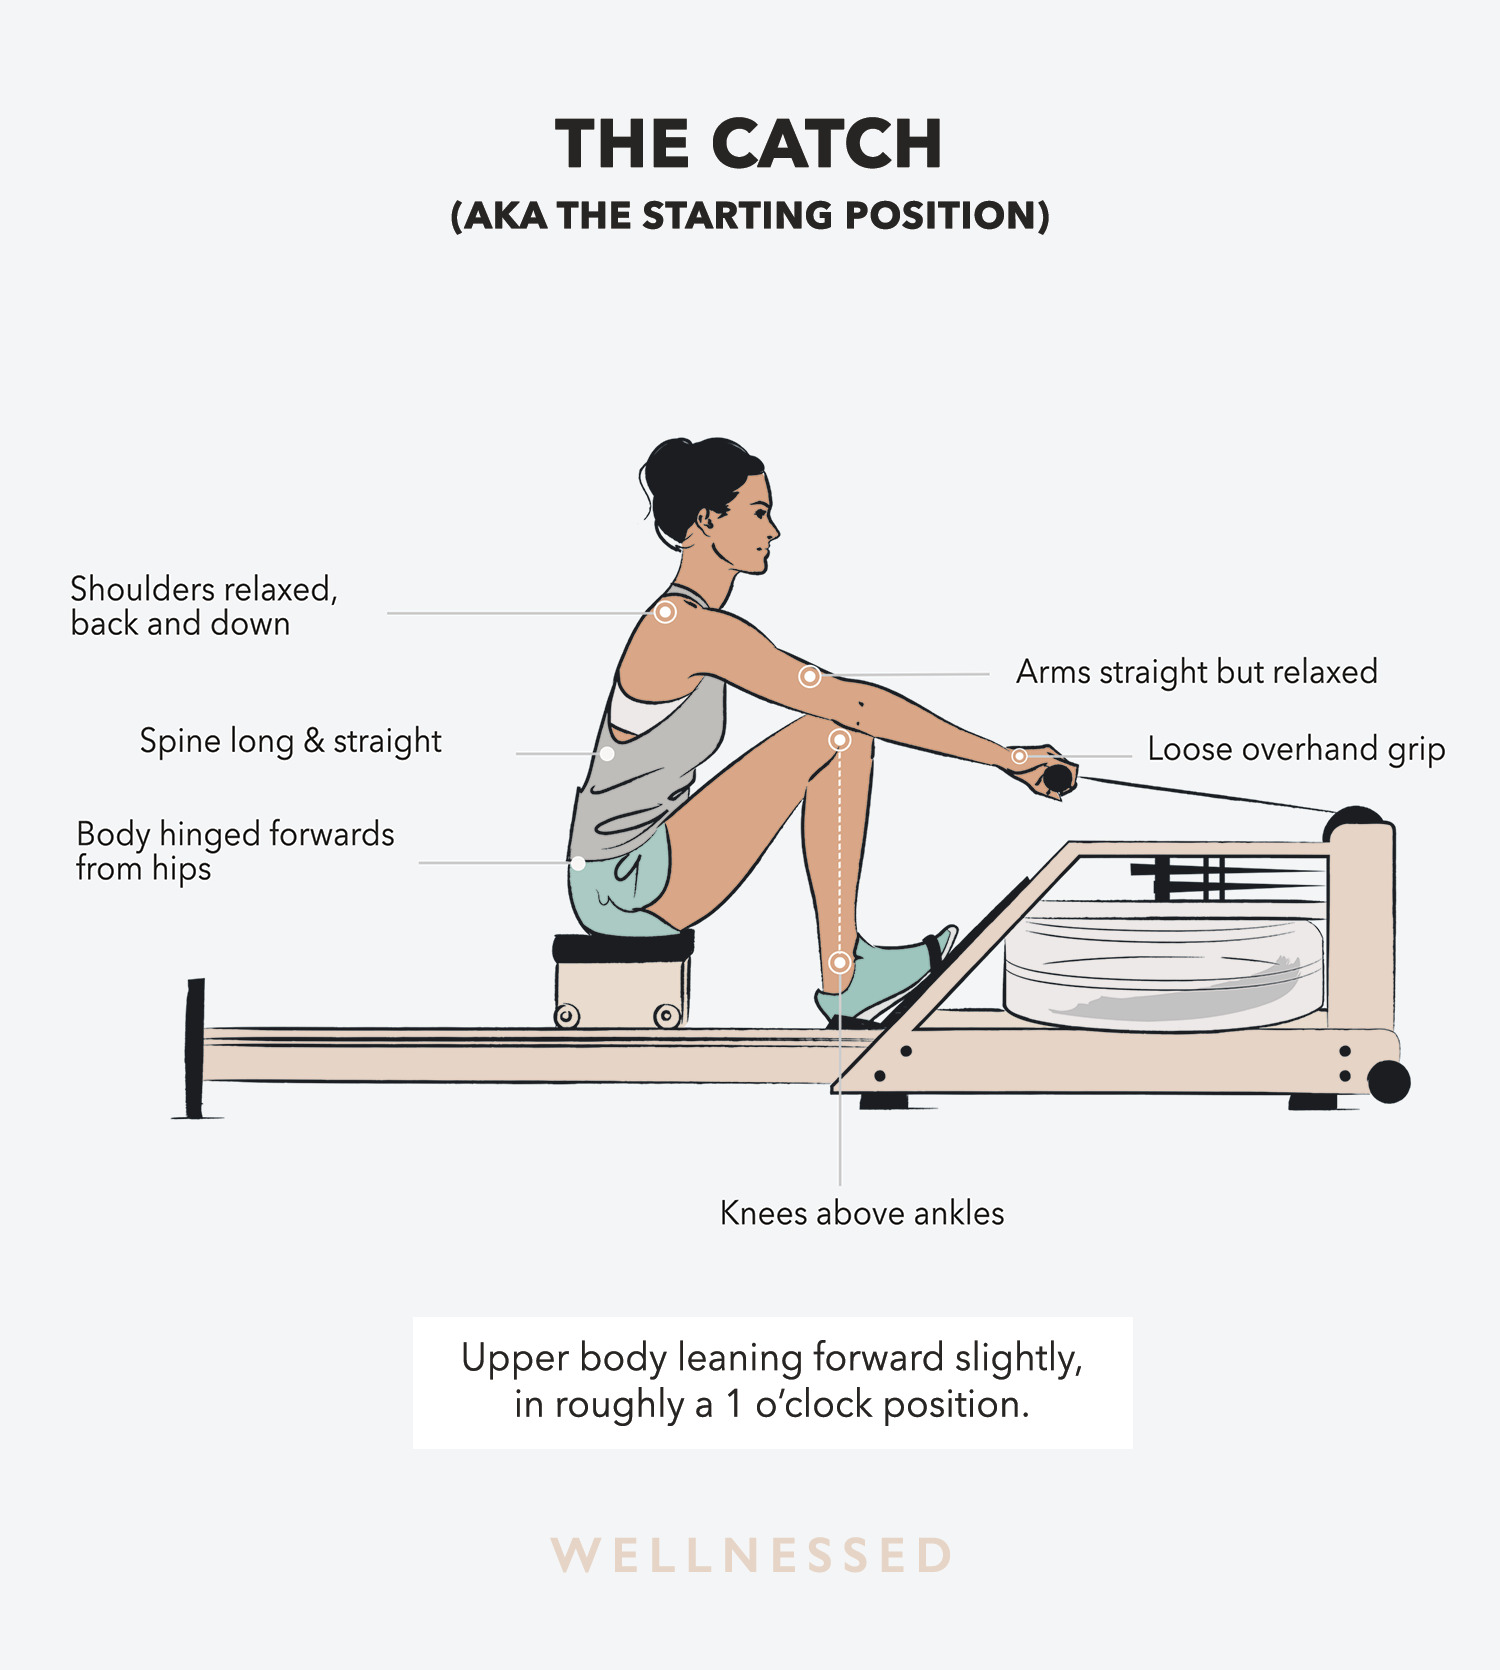
2 The Drive
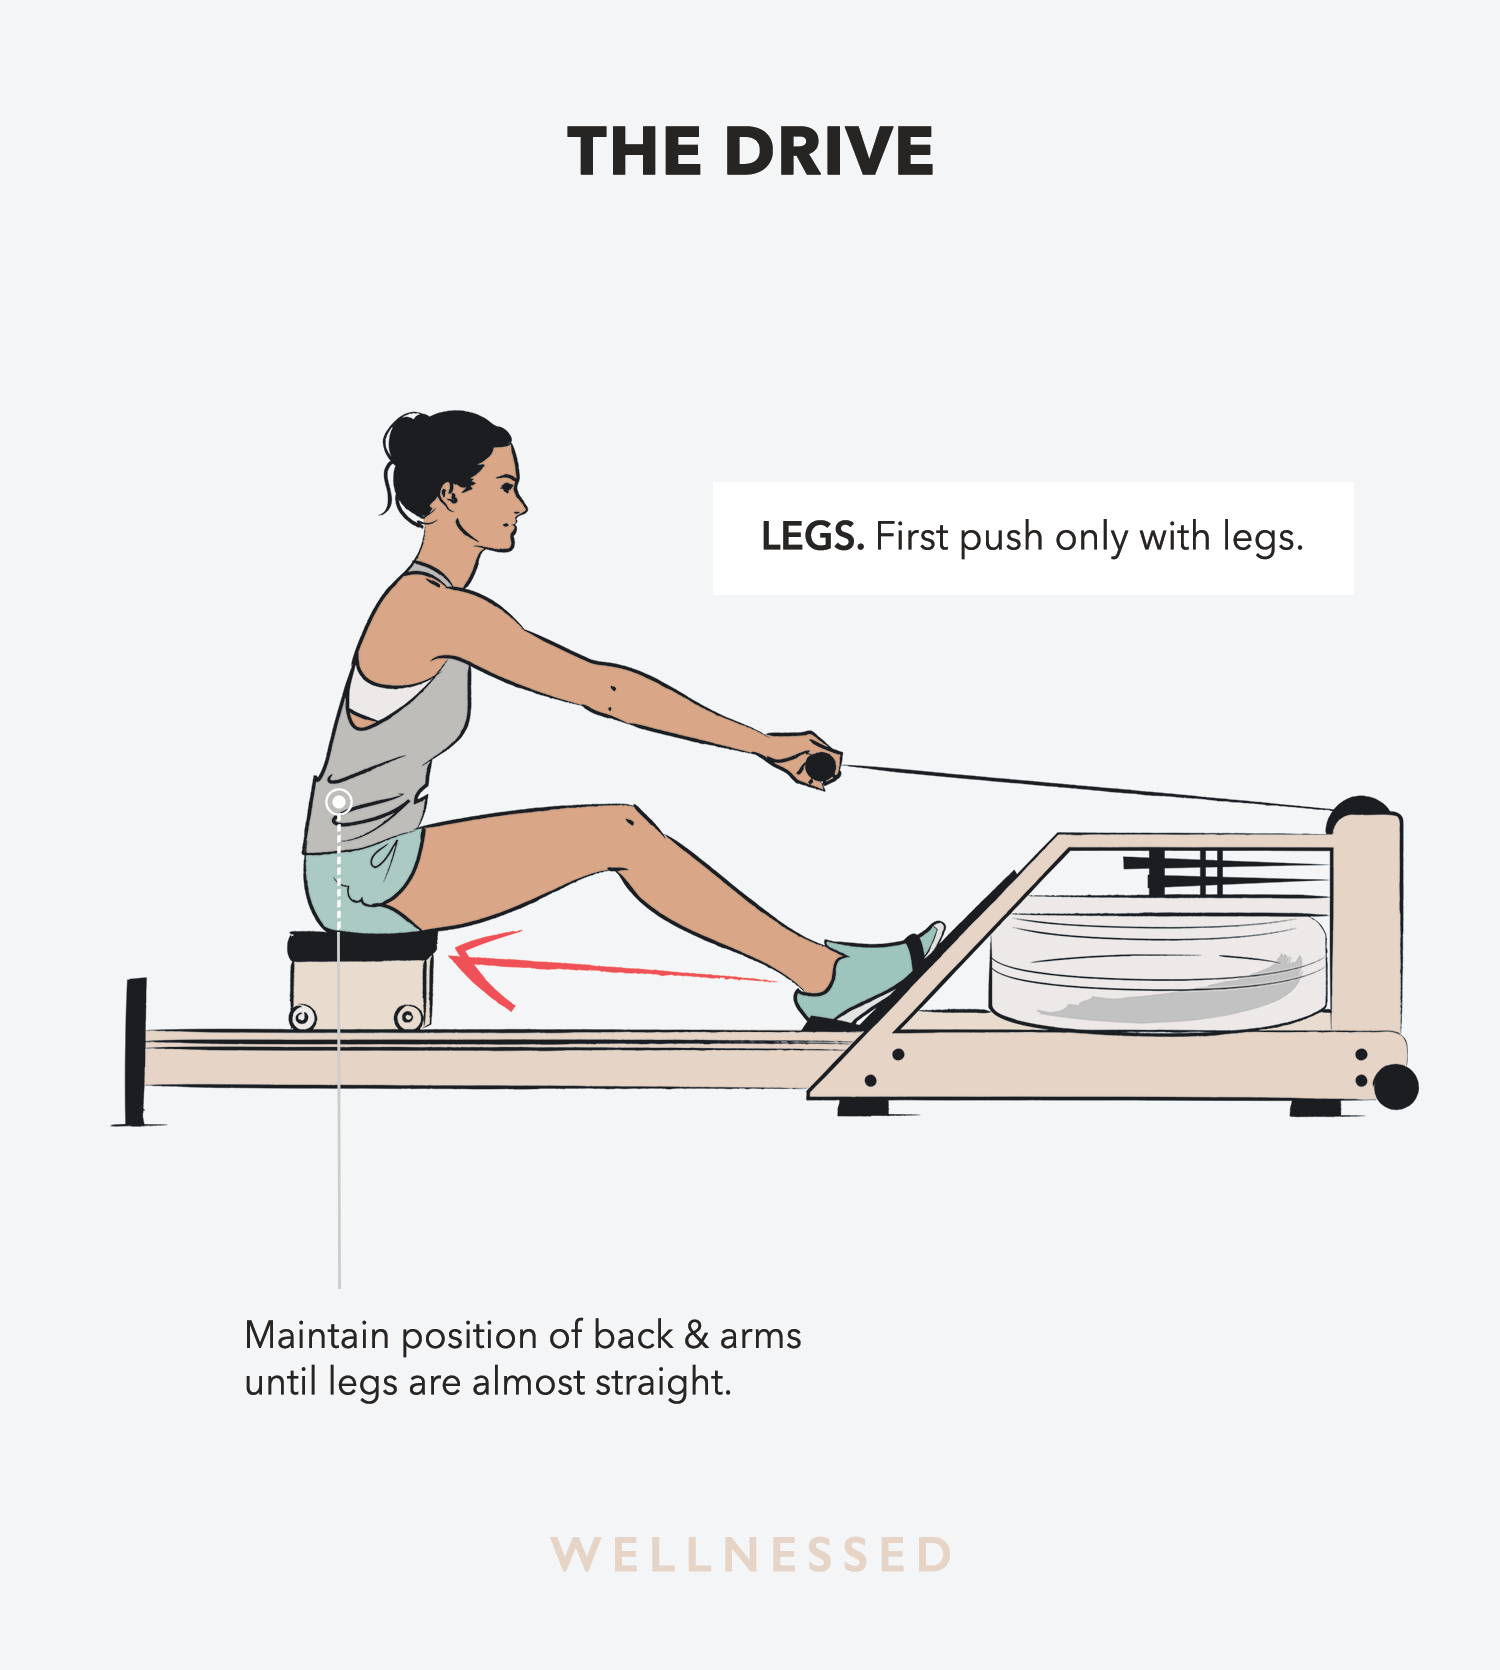
This is the main event, it’s where you generate power for the stroke. The movement is executed in a specific order – first you move your legs, then your torso, and finally your arms:
- Push with your legs, while still engaging your core, and maintaining the position of your arms and back.
- When your legs are almost straight, lean back slightly.
- As the handle passes over your knees, add a strong pull with your arms – pulling the handle close to your midsection. Keep your wrists straight and keep your elbows close to your ribs.
3 The Finish
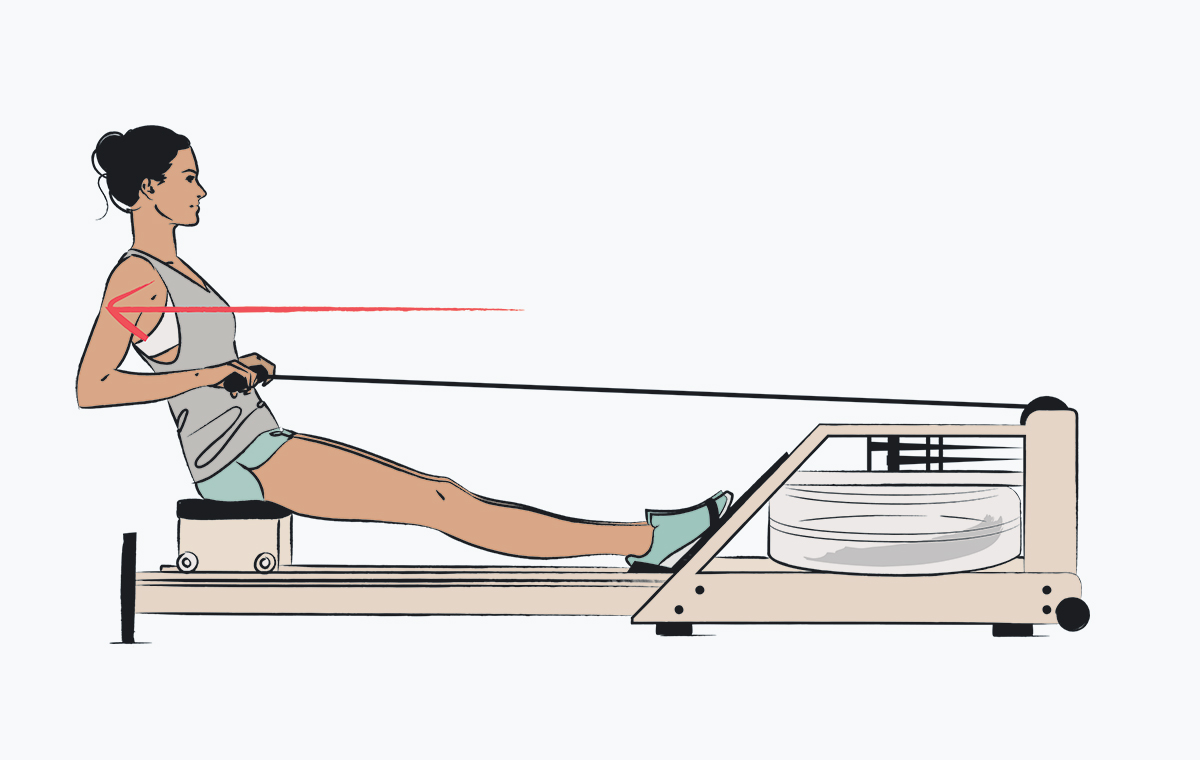

At the end of the drive phase you should be in the finish position:
- Legs are straight and the upper body is leaning back slightly (in about an 11 o’clock position).
- The handle is pulled in toward the body, the shoulders are down and the wrists straight.
4 The Recovery
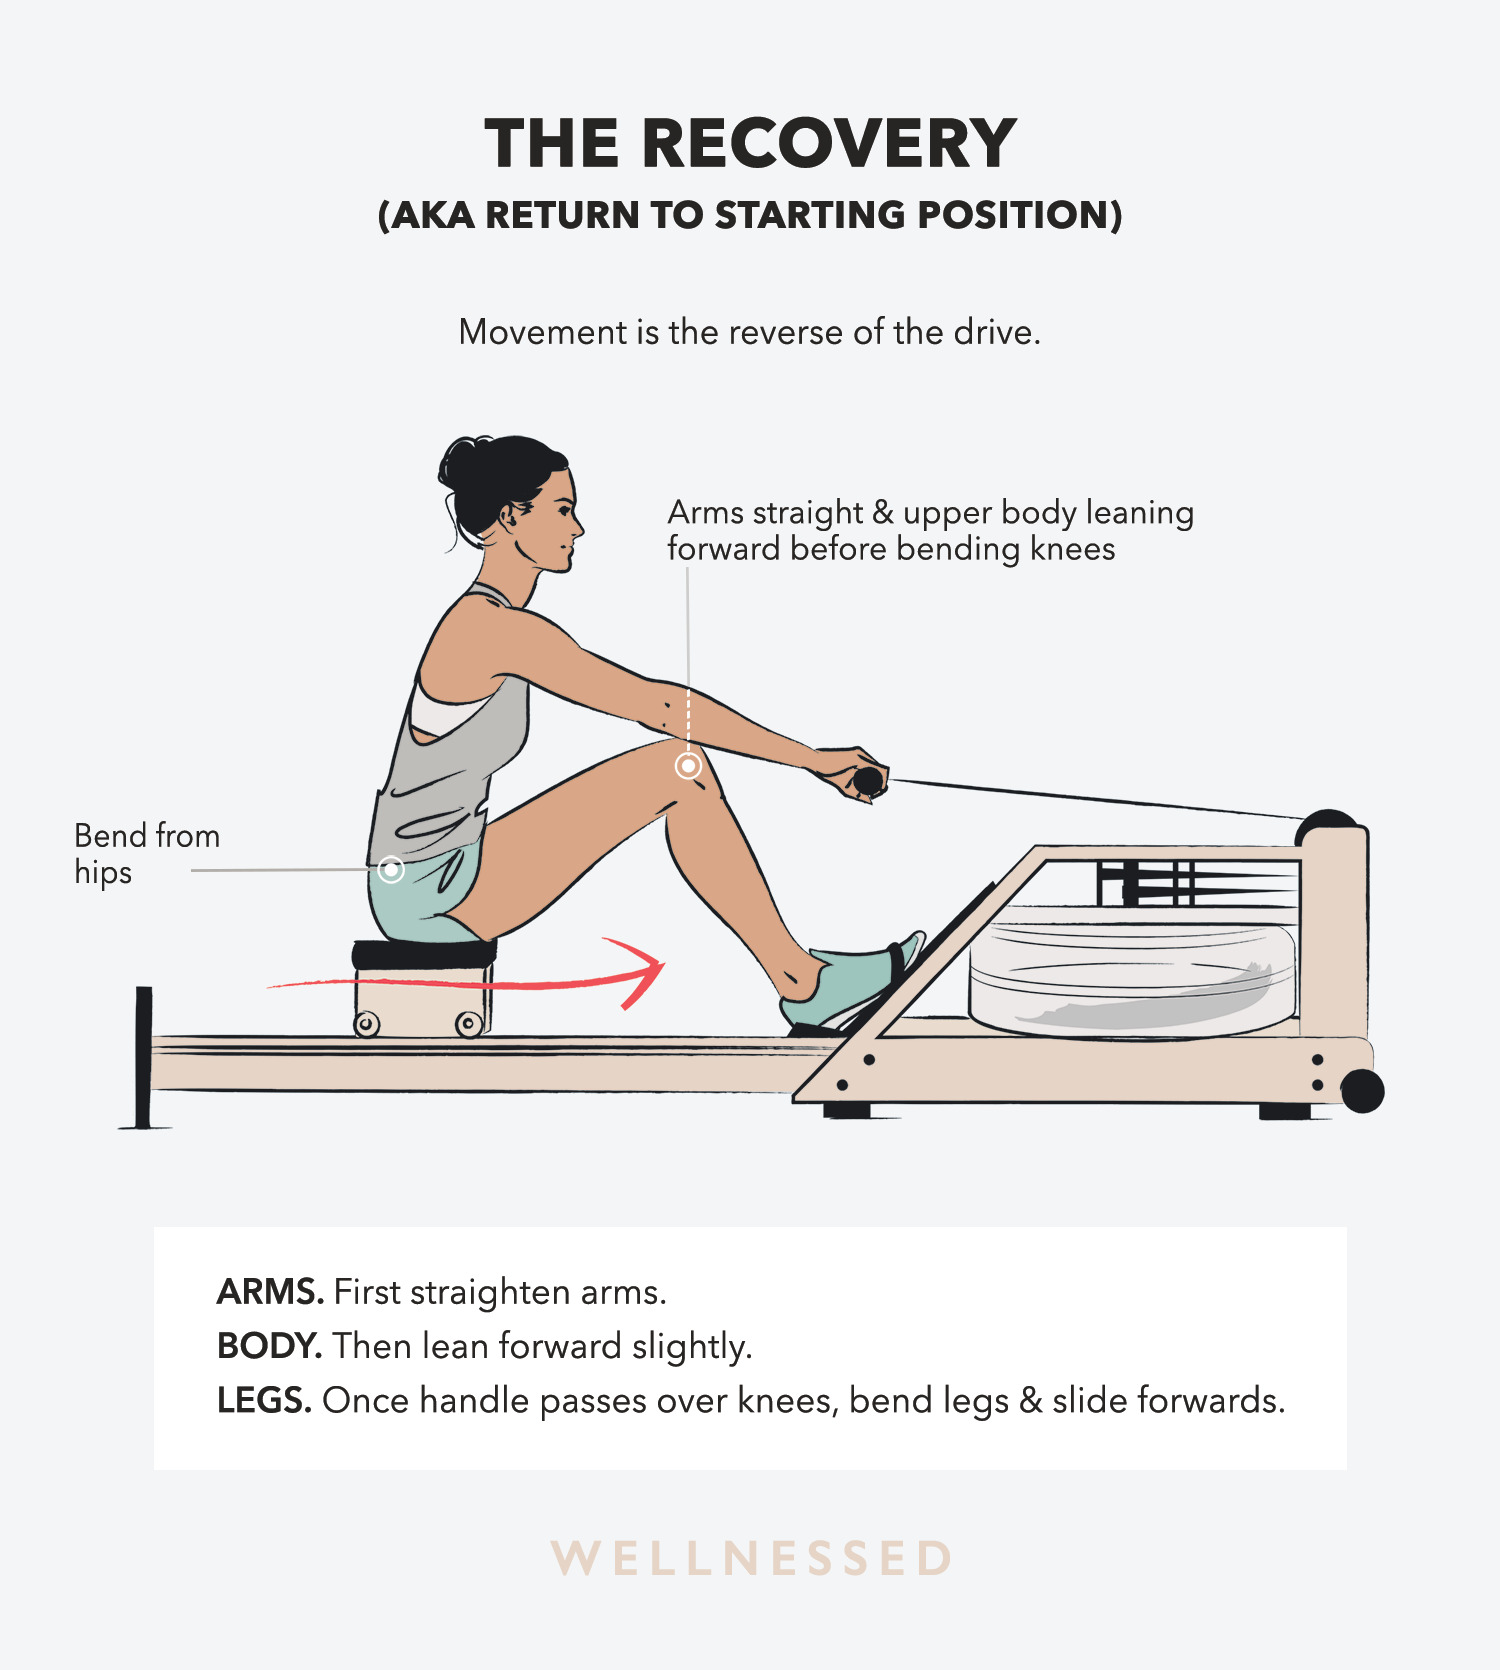
This is where you return to the starting position. The movement is the reverse of the drive – first you move your arms, then your torso, and finally your legs:
- Straighten the arms, so that the handle moves away from your body.
- Keeping the legs straight, lean forward slightly (hinging from the hips).
- Maintaining your upper body position, bend your legs as the handle passes over your knees, slide forward and return to the starting position.
The recovery phase is executed slowly, allowing you time to recover, and with control. It should take about twice as long as the drive phase.
A rowing mantra you can say to yourself to help with the sequencing is “Legs, body, arms – Arms, body, legs.”
Common Rowing Mistakes & Fixes
Now you’ve got the basics down, here’s a look at some of the common mistakes made when using a rowing machine and how to fix them.
Drive with your legs. Your legs should provide the majority of the power in rowing. Push down hard though your heels to initiate each stroke. If you aren’t “feeling” your legs when you row, trying rowing using this “legs only” drill during your warm up:
Hold the handle with your arms straight and your upper body leaning slightly backward (in the 11 o’clock position). Push only with your legs, keeping your core engaged and your arms straight. Do not pull with your arms at all.
Once you can feel your legs doing the majority of the work, add in the upper body swing, and then add your arms back in.
Pull late with your arms. Don’t begin pulling with your arms until the handle passes over your knees. Pulling too early will merely fatigue your weaker upper body muscles sooner. Use your legs to build the momentum of the fan-wheel and your arms to maintain it.
Lead with your elbows in your arm pull. This maximizes latissimus dorsi and biceps activation – the big muscles in your back and arms. Flaring your elbows out too much to the side will reduce power and waste energy by throwing stress onto weaker shoulder muscles.
Do not bend your wrists. The muscles in your forearms and wrists are very small and comparatively weak. Flexing your wrists in an effort to touch the handle to your midsection wastes energy and will cause your forearms to tire prematurely.
Keep your head up and looking forward. Look straight ahead at the screen in front of you. Looking down encourages lower back slouching.
Avoid slouching. A weak, soft midsection provides a place for energy to leak out of your body, making your stoke less efficient. If your midsection collapses, as it does when you slouch, energy that was generated through your legs and should otherwise be transmitted into your rowing handle via your arms will be lost. Slouching can also increase the likelihood of back pain. If you are a habitual sloucher, you may need to strengthen your lower back and core while working on hamstring flexibility.
Keep the chain roughly parallel to the floor. It’s the shortest distance, so make sure you keep the chain level to minimize energy expenditure! Pull the handle into your lower chest/upper stomach. Do not pull it into your chin. Do not twist the chain and do not use a “mixed grip” where one hand is palms down and the other is palms up. This simply encourages a lopsided rowing stroke.
Now put it altogether. Remember that the recovery phase should take roughly twice as long as the drive phase.
How to Adjust the Rowing Machine
All that’s left is to ensure that you make adjustments when using the rowing machine to suit your needs.
Resistance (Damper) Setting
Set the damper (this is the resistance setting on the rower) to the best position for you. The damper is like the gears on a bike.
- The lower the setting, the lower the resistance. It feels lighter and your stroke rate will be higher, but there will be less power per stroke.
- The higher the damper setting, the higher the resistance. It feels heavier and your stroke rate will be slower, but there will be more power per stroke.
Experiment with the damper settings to find the sweet spot where you can generate the greatest amount of power at the highest sustainable stroke rate, while practicing good form. Generally, it’s best to start with a lower damper setting (4 or less), as it will be easier to maintain good rowing technique, and for longer. Interestingly, many top rowers use a damper setting of between 4 and 6.
Stroke Rate
Experiment with your stroke rate, which is typically between 18 and 30. Some rowers like to pull “heavy and slow” while others pull “light and fast”. This ties in with damper setting. If you are a beginner still mastering technique, start with a lower stroke rate of 18 to 24.
Find out what works best for you by experimenting with different stroke rates. If you can hear the chain slapping as you recover from each stroke, you are rowing too fast and losing energy.
Seat Comfort
Long rows can be uncomfortable on your butt and once you are uncomfortable it’s easy to let your form deteriorate. Use a gel or foam seat to help you stay comfortable and, if you are doing a long row, stand up and stretch every 20-minutes or so to restore circulation to your behind.
Rowing Machine
Workouts
Like other cardiovascular exercises you can perform a variety of different workouts on the rowing machine, such as:
- HIIT
- Endurance workouts
- Circuit training with bodyweight exercises, and more.
Once you’ve mastered rowing with good technique, try a variety of rowing workouts. Remember to never sacrifice perfect form – you might shave a second or two off your best ever row, but you also run the risk of straining your back or sustaining some other injury.
If you are a beginner, master the basic techniques before adding extra intensity or volume to your workouts. Even a five-minute row can be quite challenging if you have never rowed before.
Beginner Rowing Machine Workout
Sample Workout
Beginners should start with a 5 to 10 minute rowing workout:
- Warm-up for 5 minutes at an easy pace. On a scale of 1 to 10 (RPE scale), the intensity should feel like a 4.
- 1 minute at moderate intensity (RPE 5-6), using deliberate strokes and focusing on form.
- 1 minute of recovery. Reduce your stroke rate or stop rowing during this period to allow yourself to recover.
- Repeat “1 mintue on, 1 minute off” cycle 4 more times, for a 10 minute workout.
- Cool-down for 5 minutes at an easy pace.
Gradually start increasing the duration and intensity of your workouts as you become stronger and more proficient in your rowing technique.
And finally, just to make things a little easier, we’ve put it all together in a handy chart showing you how to use the rowing machine.